Quick dive: ESX and maximum snapshot sizes
Even today I still encounter discussions about snapshots and their maximum size. It is somewhat too simple a test for my taste, but I’m posting it anyway so hopefully I don’t have to repeat this “yes/no”-discussion every time 🙂
The steps to take are easy:
- – Take any running VM;
- – Add an additional disk (not in independent mode);
- – Fill this disk with data;
- – Check out the snapshot size;
- – Delete all data from the disk;
- – Fill the disk once again with different data just to be sure;
- – Check the snapshot size again.
So here we go:
Create an additional disk of 1GB, and we see this:
-rw------- 1 root root  65K Oct 18 09:58 Testdisk-ctk.vmdk

-rw------- 1 root root 1.0G Oct 18 09:28 Testdisk-flat.vmdk

-rw------- 1 root root  527 Oct 18 09:56 Testdisk.vmdk
As you can see, I created a Testdisk of 1GB. The Testdisk-ctk.vmdk file comes from Changed Block Tracking, something I have enabled in my testlab for my PHD Virtual Backup (formerly esXpress) testing.
Now we take a snapshot:
-rw------- 1 root root  65K Oct 18 09:59 Testdisk-000001-ctk.vmdk

-rw------- 1 root root 4.0K Oct 18 09:59 Testdisk-000001-delta.vmdk

-rw------- 1 root root  330 Oct 18 09:59 Testdisk-000001.vmdk

-rw------- 1 root root  65K Oct 18 09:59 Testdisk-ctk.vmdk

-rw------- 1 root root 1.0G Oct 18 09:28 Testdisk-flat.vmdk

-rw------- 1 root root  527 Oct 18 09:56 Testdisk.vmdk
Above you see that the Testdisk now has an additional file to it, namely Testdisk-000001-delta.vmdk. This is the actual snapshot file, where VMware will keep all changes (writes) to the snapped virtual disk. At this stage the base disk (Testdisk-flat.vmdk) is not modified anymore, all changes go into the snapshot from now on (you can see this in the next sections where the change date of the base disk stays at 9:59).
Now I log into the VM where the disk is added to, and I perform a quickformat on the disk:
-rw------- 1 root root  65K Oct 18 09:59 Testdisk-000001-ctk.vmdk

-rw------- 1 root root  33M Oct 18 09:59 Testdisk-000001-delta.vmdk

-rw------- 1 root root  385 Oct 18 09:59 Testdisk-000001.vmdk

-rw------- 1 root root  65K Oct 18 09:59 Testdisk-ctk.vmdk

-rw------- 1 root root 1.0G Oct 18 09:28 Testdisk-flat.vmdk

-rw------- 1 root root  527 Oct 18 09:56 Testdisk.vmdk
Interestingly, the snapshot file has grown a bit to 33MB. But it is nowhere near the 1GB size of the disk. Makes sense though, a quick format does not touch data blocks, only some to get the volume up and running. Because snapshot files grow in steps of 16[MB], I guess the quick format changed anything between 16MB and 32MB of blocks.
Next I perform a full format on the disk from within the VM (just because I can):
-rw------- 1 root root  65K Oct 18 09:59 Testdisk-000001-ctk.vmdk

-rw------- 1 root root 1.1G Oct 18 10:19 Testdisk-000001-delta.vmdk

-rw------- 1 root root  385 Oct 18 09:59 Testdisk-000001.vmdk

-rw------- 1 root root  65K Oct 18 09:59 Testdisk-ctk.vmdk

-rw------- 1 root root 1.0G Oct 18 09:28 Testdisk-flat.vmdk

-rw------- 1 root root  527 Oct 18 09:56 Testdisk.vmdk
Not surprising, the format command touched all blocks within the virtual disk, growing the snapshot to the size of the base disk (plus 0.1GB in overhead).
Let’s try to rewrite the same block by copying a file of 800MB in size onto the disk:
-rw------- 1 root root  65K Oct 18 09:59 Testdisk-000001-ctk.vmdk

-rw------- 1 root root 1.1G Oct 18 10:19 Testdisk-000001-delta.vmdk

-rw------- 1 root root  385 Oct 18 09:59 Testdisk-000001.vmdk

-rw------- 1 root root  65K Oct 18 09:59 Testdisk-ctk.vmdk

-rw------- 1 root root 1.0G Oct 18 09:28 Testdisk-flat.vmdk

-rw------- 1 root root  527 Oct 18 09:56 Testdisk.vmdk
Things get really boring from here on. The snapshot disk remains at the size of the base disk.
While I’m at it, I delete the 800MB file and copy another file on the disk, this time 912MB:
-rw------- 1 root root  65K Oct 18 09:59 Testdisk-000001-ctk.vmdk

-rw------- 1 root root 1.1G Oct 18 10:21 Testdisk-000001-delta.vmdk

-rw------- 1 root root  385 Oct 18 09:59 Testdisk-000001.vmdk

-rw------- 1 root root  65K Oct 18 09:59 Testdisk-ctk.vmdk

-rw------- 1 root root 1.0G Oct 18 09:28 Testdisk-flat.vmdk

-rw------- 1 root root  527 Oct 18 09:56 Testdisk.vmdk
Still boring. There is no way I manage to get the snapshot file to grow beyond the size of its base disk.
CONCLUSION
No matter what data I throw onto a snapped virtual disk, the snapshot never grows beyond the size of the base disk (except just a little overhead). I have written the same blocks inside the virtual disk several times. That must mean that snapshotting nowadays (vSphere 4.1) works like this:
For every block that is written to a snapshotted basedisk, the block is added to its snapshot file, except when that logical block was already written in the snapshot before. In this case the block already existing in the snapshot is OVERWRITTEN, not added.
So where did the misconception come from that snapshot files can grow beyond the size of their base disk? Without wanting to test all ESX flavours around, I know that in the old ESX 2.5 days a snapshot landed in a REDO log (and not a snapshot file). These redo logs were simply a growing list of written blocks. In those days snapshots (redo files) could just grow and grow forever (till your VMFS filled up. Those happy days 😉 ). Not verified, but I believe this changed in ESX 3.0 to the behavior we see today.
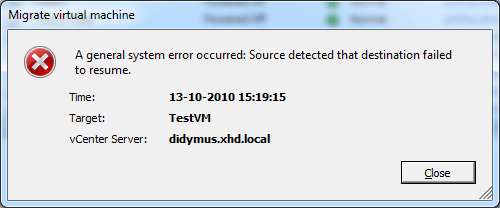
VMotion fails with “Source detected that destination failed to resume”
I recently came across a problem where VMotions would fail at 82%. The failure would be “A general system error occurred: Source detected that destination failed to resume”. So what’s wrong here?
What’s wrong?
The environment is based on NFS storage. Looking closer in the logs, I found that the VMotion process actually appears to try to VMotion a VM from one datastore to another datastore, which is kind of impossible unless we were doing a storage VMotion.
Now for the weirder part: Looking at vCenter, all NFS mounts appear to be mounted in exactly the same fashion. But looking at the NFS mounts through the command line revealed the problem: Using esxcfg-nas -l the output of the nodes showed different mount paths! The trouble lies in the name used for the NFS storage device during the addition of the shares to ESX: IP address, shortname, FQDN, even using different capitalization causes the issue (!).
Its Lab Time!
I’m not sure this is a bug or a feature within VMware. Fact is, that from vCenter I have found no way to spot this issue (NAS mounts do not show any device ID anywhere in the config). Funny, vCenter sees the differences in the NFS box name somehow on the various hosts, and changes all NAS box names to the one you most recently messed with in vCenter! This is very dirty indeed.
Potentially you could spot this situation: If you perform a refresh on the storage of an ESX node (under configuration->storage), all other nodes will follow to display the mount name used by the recently refreshed host! If you then proceed to refresh another ESX host’s storage (which uses a different name to mount to the NFS box), the mount names of all other ESX nodes in the cluster will change again to the name the host last refreshed has as a mount name! Only when you use the commandline (vdf -h or esxcfg-nas -l you can spot the difference more easily.
In vCenter:

As you can see, both of my homelab hosts are happily connected to exactly the same nas device, namely “xhd-nas01” (by the way ‘xhd’ comes from http://.www.xhd.nl, my other hobby 🙂 and yes, my two ESX nodes are called “Terrance” and “Phillip” 🙂 ).
But when looking from the console, I see this:
[root@Terrance ~]# esxcfg-nas -l

nas01_nfs is /nfs/nas01_nfs from xhd-nas01 mounted
[root@Phillip ~]# esxcfg-nas -l

nas01_nfs is /nfs/nas01_nfs from XHD-NAS01 mounted
As you can see, I used the shortname for the NAS, but I used capitals for one of the mounts. This in turn is enough to change the device ID of the NAS share:
[root@Phillip ~]# vdf -h /vmfs/volumes/nas01_nfs/

Filesystem            Size  Used Avail Use% Mounted on

/vmfs/volumes/eeb146ca-55f664e9

922G  780G  141G  84% /vmfs/volumes/nas01_nfs
[root@Terrance ~]# vdf -h /vmfs/volumes/nas01_nfs/

Filesystem            Size  Used Avail Use% Mounted on

/vmfs/volumes/22b2b3d6-c1bff8b0

922G  780G  141G  84% /vmfs/volumes/nas01_nfs
So in fact, the Device IDs really ARE different! Everything works, right until you try to perform a VMotion. Then you encounter this error:
So how to solve the problem?
If you have the luxury of being able to shut your VMs: Shut them, remove the VMs from inventory, remove the NAS mounts from your hosts, then reconnect the NAS mounts (and this time using the exact same mounthost name!). After that, you can add the VMs back to your environment and start them again.
If shutting your VMs is not that easy, you could consider creating new NAS mounts (or find some other storage space), and use storage VMotion to get your VMs off the impacted NAS mounts. Then remove and re-add your NFS stores and use storage VMotion to move the VMs back again.
In my testlab I created an additional NFS mount, this time on both nodes using the same name (FQDN in this case):
[root@Terrance ~]# esxcfg-nas -l

nas01_nfs is /nfs/nas01_nfs from xhd-nas01 mounted

nas01_nfs02 is /nfs/nas01_nfs02 from xhd-nas01.xhd.local mounted
[root@Phillip ~]# esxcfg-nas -l
nas01_nfs is /nfs/nas01_nfs from XHD-NAS01 mounted
nas01_nfs02 is /nfs/nas01_nfs02 from xhd-nas01.xhd.local mounted
And you can see this time the device IDs really ARE equal:
[root@Terrance ~]# vdf -h /vmfs/volumes/nas01_nfs*

Filesystem            Size  Used Avail Use% Mounted on

/vmfs/volumes/22b2b3d6-c1bff8b0

                      922G  780G  141G  84% /vmfs/volumes/nas01_nfs

/vmfs/volumes/5f2b773f-ab469de6

                      922G  780G  141G  84% /vmfs/volumes/nas01_nfs02
[root@Phillip ~]# vdf -h /vmfs/volumes/nas01_nfs*
Filesystem Size Used Avail Use% Mounted on
/vmfs/volumes/eeb146ca-55f664e9
922G 780G 141G 84% /vmfs/volumes/nas01_nfs
/vmfs/volumes/5f2b773f-ab469de6
922G 780G 141G 84% /vmfs/volumes/nas01_nfs02
After a storage VMotion to this new NFS store the VM VMotioned without issue… Problem solved!
Breaking VMware Views sound barrier with Sun Open Storage (part 2)
It’s been months since I performed a large performance measurement using the Sun Unified Storage array (7000 series) in conjunction with VMWare View and linked clones. Not much has been done with the report, not by me, not by Sun, not by my employer.
So now I have decided to share this report with the world. In essence it has been a true adventure “how to cram as many View desktops (vDesktops) into an array as small and cheap as possible”. The Sun 7000 series storage is built around the ZFS filesystem, which can do amazing things when used right. And linked clone technology appears to be a perfect match to the ZFS filesystem when combined with Read and log optimized SSDs. Combined with NFS, the “sound barrier” was broken by not needing VMFS and all of its limitations when it comes to using more than 128 linked clones per store. Instead, we did hundreds even nearing a thousand linked clones per store!
In the end, we managed to run over 1300 userload-simulated vDesktops without noticable slowness / latency. Then the VMware testing environment ran out of physical memory and refused to push further. To the Sun storage we had a sustained 5000-6000 WOPS at that time, which the ZFS filesystem managed to reduce to no more than 50 WOPS to the SATA disks. Too amazing to be true? Well, read all about it:
For the faint hearted, the excerpt can be download from here:
Performance Report Excerpt Sun Unified Storage and VMware View 1.0 (713 KB)
Or read the full-blown report here:
Performance Report Sun Unified Storage and VMware View 1.0 (4.06 MB)
PHD Virtual Backup software with XenServer support: One down, ESXi to go
PHD Virtual, creators of the backup product for VMware environments formerly known as esXpress, have introduced a new version of their PHD Virtual Backup software with support for Citrix XenServer.
The PHD Virtual Backup product is the first “virtual only” backup product with full support for Xen based virtualization I know of. But then again, I am no XenServer expert. For me, this is not too important at the moment, because I’m still very focussed on VMware only. But it is a major step for PHD Virtual; a lot of vendors are roadmapping support for all leading virtualization platforms, but today PHD Virtual actually delivers!
Keep going guys! The backup solution they have on the market right now for VMware is simply brilliant, especially in its robustness and its almost famous “install and forget” ability. I actually installed the product at several customer sites, and it started backing up. Fully automated, no headaches. No one ever bothered again. New VMs are automatically added to the list to backup if configured to do so. Simply brilliant. In many ways VMware has been looking closely as to how esXpress has been doing backups. Prove of this is VMware’s Data Recovery, which basically is a poor copy of esXpress in its way of working.
Some other vendors have been shouting about this great “hotadd feature” they now support. People tend to forget that esXpress has used similar technology for several YEARS now! Because hotadd did not exist then, they were forced to use “coldadd” , meaning their Virtual Backup Appliances (VBAs) needed to be powered down between backups (to clarify: NOT the VMs to be backed up).
Whether you use hot- or cold-add, backup speeds are great in any case. But cold-add has a drawback: The VM performing backups has to be powered up and down, reconfigured etc. That takes time. Especially now that Changed Block Tracking (CBT) is used by most vendors, a backup can take as little as 20 seconds if not too many blocks have changed within the virtual disk to backup. And this is where “cold-add” start to hurt: Reconfigure, power up and down of the VBAs for every virtual disk to backup easily takes a 3-5 minutes to complete.
PHD Virtual has been working hard on a version which is compatible with ESXi. Especially now that VMware is pushing even more towards ESXi, this is more important than ever. I hope to see a beta version soon of the ESXi compatible product; I cannot wait to test 🙂 . This will also solve the “cold-add” overhead, because I’ve been told this version will use a single VBA per ESX node which hotadds multiple disks in parallel and then performs the backup also in parallel. Very exciting: Hopefully we’ll see both backup efficiency and robustness like never before. Add replication in the mix (which is a part of the product by default) and you have a superb solution at a relatively low cost.
PHD Virtual Backup with XenServer support link:
http://www.phdvirtual.com/solutions/server_virtualization_citrix_xenserver.php
vSphere 4.1 and virtual disk names
I just spotted something that had not occurred to me yet… A small new detail in vSphere 4.1 (or I just missed out on it previously)… VMware has had this “problem” for a long time: If you added a second virtual disk to a virtual machine on a datastore different from the location of the first virtual disk, vSphere used to name that new virtual disk the same as the base disk. Well not any more!
I noticed in vSphere 4.1 that this is no longer true. A second disk created on a separate datastore gets its name from the virtual machine (like it used to be), but with a trailing “_1” in the filename.
For a long time backup vendors have been battling with this “issue” because the backup software ended up with two virtual disks that were both named the same… In a lot of environments that meant manual renaming and remounting second and third disks to VMs in order to get proper backups without having to guess which disk goes where.
Amazing that these things all of a sudden get fixed now that VMware has its own backup solution 😉
vCenter 4.1 and CPU usage
I have a very tiny testing environment, which I just upgraded to vSphere 4.1. I chose to reinstall the vCenter server on a 64bit Windows 2003 VM with a local SQL express installation, having only 1GB of memory and a single vCPU. I know this is against best practice, but I like to follow the much older best practice to “start out small” like VMware has been (and still is) preaching about. So I started out small. Although 1GB of memory is not even really small for my measures 🙂
I quickly noticed that the VM was running fine at first, but soon started hogging CPU resources, and was hardly responsive. vCenter 4.1 could not have grown to such a resource eater I figured. So I checked to settings of the Windows server, and I changed the swapfile size to a fixed value (the system managed size can have impact when growing).
To have a look at the SQL settings, I decided to download and install the Microsoft SQL Server Management Studio Express tool, which can be obtained here.
Looking into the settings, I noticed that SQL is set to take all memory it can (the max value was set at 2TB I believe). I changed that setting to 768MB, meaning SQL can use 768MB as a maximum, leaving 256MB for “the rest” (read: vCenter and VUM). If needed you might fiddle with this setting.
After changing these values, vCenter began to respond properly. Sometime the VM gets really busy, but quickly returns to “normal” behaviour; no more “stampede”.
Take care: This is in no way meant for a full-blown production environment. Always follow VMware’s best practices… But if you have a test environment which is really REALLY small, consider these changes to extent the life of your single socket, dual core ESX nodes by a year (or possibly two) 🙂
No COS NICs have been added by the user – solved
Now that I am busy setting up UDA 2.0 (beta14) for a customer to be able to reinstall their 50+ VMware servers, I stumbled upon this message. The install would hang briefly, then proceed to a “press any key to reboot” prompt. Not too promising…
After searching the internet I found a lot of blog entries on exactly this error. I could not find any useful hints or tips that would solve my problem; I have been checking the disk layout over and over again, to make sure no mistakes were made there. I was starting to pull my hair out, because it did work previously.
Then I started thinking; the customer in question has multiple PxE servers in the same network, and special DHCP entries were created for all vmnic0 MAC addresses, so that option 66 and 67 could be set to point to the UDA appliance. I think their DHCP server denies DHCP to any MAC address unknown to it, because right before the “press any key to reboot” I saw something passing in the line of “unable to obtain a dynamic address”. I figured in the initial setup, the kickstart part tries to get a DHCP address using the Service Console virtual NIC (with a different MAC address each time you reinstall). So I tried to alter the “Kernel option command-line” from this:
ks=http://[UDA_IPADDR]/kickstart/[TEMPLATE]/[SUBTEMPLATE].cfg initrd=initrd.[OS].[FLAVOR] mem=512M
PHDVirtual releases Virtual Backup 4.0-4 with vSphere 4.1 support
PHDVirtual has released an updated version of their famous Virtual Backup solution (formerly esXpress). This version fully supports VMware vSphere 4.1, and is one of the first (if not THE first) of the 3rd party “high tech virtual backup only” to support vSphere 4.1
I was very quick into upgrading my test environment to vSphere 4.1 (right after the general release), breaking the PHDvirtual backup in the process. For days the environment failed to backup, because vSphere 4.1 introduced a snapshot issue with esXpress. PHDvirtual worked hard to get vSphere 4.1 supported, and on 9/17/2010 they released version 4.0-4 which did just that.
So I upgraded my test environment to PHDvirtual 4.0-4. Right after the upgrade I forced a reinstall on the ESX nodes to 4.0-4 from the 4.0-4 GUI appliance, and I kicked of an initial backup by renaming a VM from the VI client to include [xPHDD] in the VM name. PHDvirtual Backup picked it up, renamed the VM back and commenced performing the backup. It just worked straight away. Even CBT was still functional, and my first Windows VM backed up again with only 2.2[GB] in changed blocks. Awesome!
From the initial tests it shows that both speed and stability are just fine, not very different from the previous release. Still fast and definitely rock solid. Highly recommended!
VMware releases vSphere 4.0 update 2
VMware just released vSphere 4.0 update 2. Not much new stuff, except improvements in Guest Operating Systems improvements:
Guest Operating System Customization Improvements: vCenter Server now supports customization of the following guest operating systems:
- Windows XP Professional SP2 (x64) serviced by Windows Server 2003 SP2
- SLES 11 (x32 and x64)
- SLES 10 SP3 (x32 and x64)
- RHEL 5.5 Server Platform (x32 and x64)
- RHEL 5.4 Server Platform (x32 and x64)
- RHEL 4.8 Server Platform (x32 and 64)
- Debian 5.0 (x32 and x64)
- Debian 5.0 R1 (x32 and x64)
- Debian 5.0 R2 (x32 and x64)
Also a lot of resolved issues; which is always nice to have!
Throughput part 4: A day at the races (Hotspotting case)
The fourth part of this triptych ( 😉 ) is a customer case of hotspotting on storage. The graphs speak for themselves! Some storage design decisions they made caused them a lot of trouble…
Birth of the storage design
The customer in question was going to run a large VDI (virtual desktop) deployment in several pods. The first pod was designed with two low-cost FC SANs, each having 48 SATA disks. A single SAN should deliver full-clone desktops for 500 users. Running on a “conventional” FC-SAN (no ZFS filesystem or large caches) 48 SATA disks for 500 vDesktops alone is what I’d call a challenge already!
Apart from that they started out right, by choosing a RAID10 configuration. They reserved two SATA disks to function as a hot-spare. So far so good. But then what? You have 46 disks left, and you must put them in a RAID10. They decided so create ONE single RAID10 volume, consisting of 46 disks, thinking that for each I/O performed all disks would be used, boosting performance. On top of that, they decided to use 512KByte as a segment size, because VMware uses a blocksize of at least 1Mbyte anyway (both not true of course). The setup on a disk-level looks something like this:
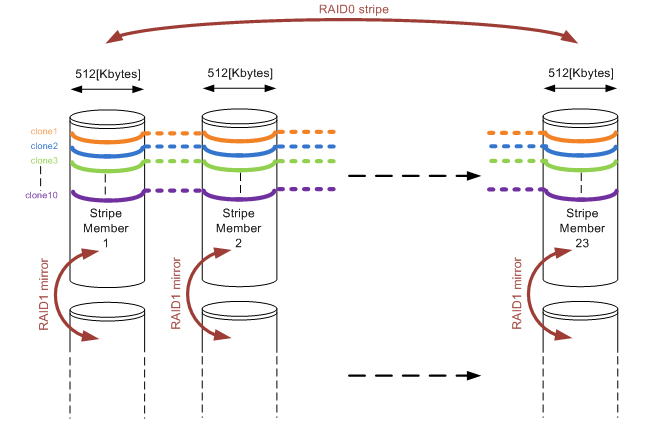
Figure1: RAID10 array consisting of 23 stripe members and showing 10 full-cloned vDesktops layed out on the disks.
For those of you who have read the other parts of my throughput blogs, might already have spotted where things go wrong. In fact things went horribly wrong as I’ll demonstrate in the following section.
What’s happening here?
As described in Throughput part 1: the basics and Throughput part2: RAID types and segment sizes, in a random I/O environment you optimally want only one member of a stripe to perform a seek over a single I/O. That is covered when using 512KB segments. During a complete random I/O pattern, things really aren’t that bad: the randomness makes sure all mirror pairs will be active, no matter how big the segment size might be. The large number of members does not impact rebuild times as well in a RAID10 configuration.
The very large amount of stripe members (23 mirror pairs) in combination with the rather large segment sizes is what really caused the fall though. As soon as the environment was running a larger number of vDesktops, and new vDesktops were cloned, things got bad fast. Full cloning technology was used, which means that each vDesktop has a full image on disk (about 16Gbytes in size). The VDI solution used, was only able to limit the deployment of vDesktops to a number per ESX host. To make a short story even shorter, during a deployment they ran 10 full-cloning actions in parallel against a single SAN. Watch and be amazed what happened!
A day at the races
So why is this blog called “a day at the races” anyway? Well, it simply reminded me of horse racing (and Queen rocks 😉 ). Time for some theory before we prove it also applies in real life. Let’s assume we already have vDesktops already running (let’s say about 250 of them; the number is not really relevant here). They perform random I/O’s on the SAN, loading all disks to some degree (performance wise).
Now we start a single cloning thread (the VDI broker calls for a cloning action to VMware). Sequential reads and writes start to occur (from the template into the new vDesktop virtual disks). Assuming this clone runs at just about 60[MB/sec] (which is a realistic yet theoretical number), and the segment size is 0,5Mbytes over 23 stripe members, each stripe member is accessed about 60 / 0,5 = 120 times every second. No bells ringing yet…
Now think about not one clone, but 10 of these full cloning actions running simultaneously. Remember each cloning action accesses only one stripe member at a time (as they progress through all of the stripe members over and over again). Basically all cloning actions race each other over the stripe members, each a few full-stripes below the other (see figure 1). Assuming they never run at exactly the same speed, it is to be expected two full clones will meet on the same stripe member, slowing things down for these two full clone actions, sticking them to that single stripe member for the time.
As soon as they slow down, the other cloning actions which still run faster “crash” into the rear of this stripe member as well. In the end, all full cloning actions are hammering on the same stripe member, while all other disks are not being accessed by the cloning action at all. Hopefully you’l get the idea when looking at figure 2:
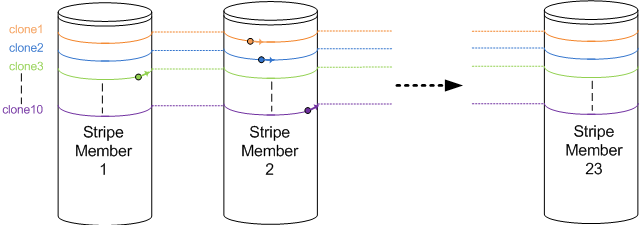
Figure 2: Ten cloning actions racing each other. All are writing on the impacted Stripe Member 2. Clone10 (purple) is about to escape, while clone3 (green) is about to crash into the rear of the impacted Stripe member again.
Each cloning action runs along one of the coloured lines, visiting all stripe members over and over again. Multiple writes being performed to a single stripe member will cause all those writes to slow down (the stripe member gets busier). This in turn causes the other sequential writes which did not slow down yet to “crash into the rear” of the impacted stripe member, causing an even bigger impact. This finally results in all cloning actions hammering on the same single stripe member, forcing the entire SAN to its knees.
As soon as one full clone “escapes the group”, it finds the other stripe members which do not suffer from the hammering. So they pick up speed, race through the non-impacted stripe members, and simply crash into the rear of the stripe member where they just managed to escape from again. Basically, the system will keep hammering on a single stripe member!
In the end, the 10 parallel full cloning actions effectively use one single stripe member, giving the performance of one single SATA disk (RAID 1 write penalty is 2, meaning a stripe member (=mirror pair of disks) perform like a single SATA disk for writes). The overall cloning performance was measured, and went down to about 5 [MB/sec] effectively. Running vDesktops came to a near-freeze.
When you calculate the frequency in which the stripe members are “visited” now, you’ll find that each stripe member is accessed about 5 / 0,5 = 10 times every second. This is a frequency of 10[Hz], very visible to the human eye! So you could actually see this happening on the array (10 times a second the disk activity leds will swipe across the array). Too bad I don’t have a video on that one 🙁
Here some latency graphs on the array during the parallel deployment of 10 full clones:
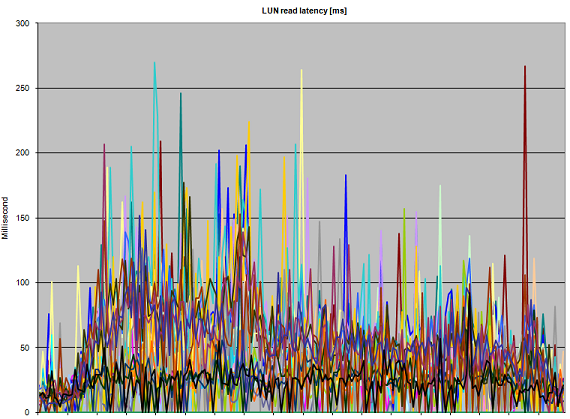
Figure 3: Abnormal read Latency during 10 parallel full-clone actions
Figure 3 clearly shows that performance suffers. Even though the heavy writes are are thought to be the guilty ones, all reads that have to be performed on the impacted stripe member suffer as well, kicking up read latency well over 150 [ms]. The reason the graph keeps touching the lower parts of the graph (which are low-latency reads) are probably the effect of read cache (when disks are not required to service a read request).

Figure 4: Abnormal write Latency during 10 parallel full-clone actions
Write latency in figure 4 is really showing the infamous “A bridge too far”. Especially in the left side of the graph, latencies run up dramatically. The LUNs that draw a thin line along the 10[ms] boundary do not appear to be impacted as much as the other LUNs; this is probably due to the fact that these LUNs are not being written to by a full clone action, so therefore only the random writes performed by the already running vDesktops are registered there. Nonetheless they also see the impact of the cloning (note the starting situation where all write latencies are well below 3 [ms] ).
All other vDesktops running are still performing their random I/O. As long as they do not hit the “impacted stripe member” they just go about their business. But as soon as they hit that stripe member (and they will), they start crawling. In effect, the entire SAN performance appears to crumble, and the vDesktops freeze almost completely.
How to fix things
So how do you fix these issues? The answer is relatively simple: The customer upgraded their disks to 15K SAS drives (being a more realistic configuration for running 500 vDesktops), and they divided the available disks in 4 separate RAID10 groups instead of just one. Also, they decreased the segment size to 64KBytes, which appears a much more sane design.
The smaller segment size will cause cloning actions to stick to a particular segment for a much shorter period of time. More disk volumes with smaller number of members in the stripe will help to isolate performance impact. Together with faster disks performance was boosted effectively (a 15K SAS drive delivers about three times the amount of IOPS a single 7K2 SATA disk can handle).


 LinkedIn
 Twitter